
In this post I will explain the tricks of low poly style landscape render with 3Ds Max. I started the project by creating the plane for the ground base mesh. Its a simple almost square 20×25 segment plane. Then I converted to “Edit Poly” by right clicking the mesh.

After creating ground I heightened the hills and the mountains with “soft selection tool” which is in Soft Selection panel at right side.
 When I create the mountain tops I increased the pinch value of the soft selection tool as you see in the picture at left. Pinch value make the vertices which is in the falloff area of the selection stronger or weaker. The graph below values must be seen like a mountain.
Tip: You can start to create mountains with a lower pinch and you can increase the value a little after.

I finally decided to leave the mountains like above. 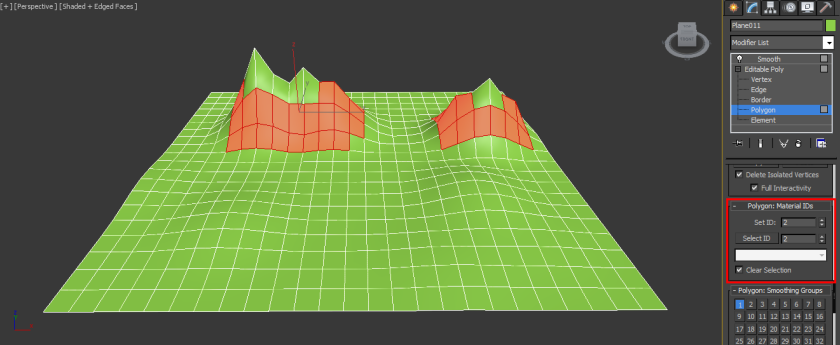
After finishing the ground, mountains material have to be set up. I decided to paint mountain body to brown and top of the mountain to white. Due to there is only one mesh to paint 3 different materials, the best solution is to use “multi-sub object”. To use this kind of material, Polygon Material ID’s must be grouped. I left the polygons that will be grass to default 1, I set the mountain body to ID 2 and the mountain top to ID 3. It can be set in Polygon Material IDs in the Edit Poly tab. As you can see above. Before setting the IDs the polygons which will be grouped must be already selected.

I am using “smooth” modifier to harden the meshes. It can be selected in modifier list>smooth. If Auto Smooth is selected, decrease the treshold amount and the mesh will be like low poly style.
To create the multi/sub-object, Open the Material tab (press M) then click the button which says “standart” which is shown in the first picture above. It will open a new window. Pick “Multi/Sub-Object”. As you see in the 3rd picture above there is a list of material slots. Due to polygon material groups which is I did before the ID groups of the material will paint them.
1st ID is green for the ground
2nd ID is brown for the mountain body
3rd ID is white for the mountain top
If the material IDs set correctly the mesh will be shown like the picture below.


I created the trees in a very basic way. I created a cone, copied it 4 times and attached with a stick. I set the polygon material groups of the leaves to 2 and left the stick to default 1. I made a new multi sub object material and added it to the tree.
Creating the clouds is a little bit tricky. I created a basic sphere with 16 segment then I used “pro-optimizer” modifier which is in the modifier list menu and I added “smooth” modifier to make it look low poly style. Just copied 3 times and variated it.

Stone is also created with the same modifiers.

To create a forest, copying and copying is not the best way. It takes time and it will be like un aligned by the ground with hills. I think the best way to make a forest is to using the “Object Paint Tool” which is above of the viewport screen. Before using this tool make sure the object that you want to copy is 1 mesh.
Press the button which is marked with the number “1” then click the tree mesh. Press the button which is marked with 2 and you can click to the ground where you want to create a tree. It will copy the tree where you will click. It is also aligned by the Axis “Z”. It means if you click the mountain the tree will not stay below the ground. If new trees are so big you can manipulate the values which is marked with “3” cyan color.

I put the stones with the same tools. I copied some clouds to the sky and added some details like the river, rainbow and stuff.


So how the render in 3ds max setting ? i’m newbie and my result doesnt smooth like that when press the render button, thx
LikeLike
Hi,
Smoothing is much depending on light sources. In this scene I used a “MR Area Omni Light” with parameters of
“intensity :1.0”
Shadows:On (with raytrace shadow map)
below the area light parameters rollout:
“On” clicked
“Show icon in renderer” clicked
Type: Sphere
Radius: depends on how big your composition. Try to keep it big enough because it makes the soft shadows. You can try different scales to see how it works.
Finally I created a skylight with the intensity “0.35”.
Your renderer must be Mental Ray. When you press the render button, result must be look like closer to my composition. I would be glad to see your result.
LikeLiked by 1 person
Great stuff. its helpfully! i hope you create more some tuts using 3ds max, thanks bro!
LikeLike
Great tutorial. result of my work in link .
LikeLike
Great! Thanks for sharing
LikeLike